Storm Bee

New Surron Questions
Please fully charge the battery first, plug in the orange discharge plug on the battery, and then plug in the blue plug (note the order: orange first, then blue; when removing, blue first, then orange). The orange plug is the power output plug and the blue plug is the battery communication plug. Check the tire pressure and whether all self-installed screws are tightened. Remember to wear a helmet and other protective gear, and comply with local traffic regulations.
The power requirements are marked on the charger. Please strictly follow the steps in the owner's manual.
The Surron achieves its longest range at around 45km/h. Gentle acceleration and maintaining a low average speed can extend the range as much as possible.
The lights have no switch and stay on whenever the Surron is powered on.
Make sure the total mileage is within the range of your Surron, and consider returning when 60% of the battery remains. You can ride approximately 120km at 20km/h. Significant altitude gain and frequent hard acceleration will increase battery consumption.
The Surron is available in a variety of models. Registration requirements vary by model and region. Please consult your local transport authority. Non-road models cannot be registered and are for off-road use only.
You can visit a local authorized Surron dealer to test ride. You will need to provide a valid motorcycle licence and sign a test ride agreement before you can proceed.
Visit sur-ron.co.nz to find your nearest authorized Surron dealer.
Surrons are shipped in cartons on pallets, optimized to reduce plastic use. Inside the box you will find everything you need to set up your Surron, including all the relevant tools. If you choose to pick up your Surron from an authorized dealer, they will assemble it for you beforehand.
Please contact your authorized Surron dealer or visit sur-ron.co.nz for estimated delivery timeframes in your region.
Licence requirements depend on your local regulations. Please check with your local transport authority for the applicable requirements in your region.
Please contact your authorized Surron dealer or visit sur-ron.co.nz to enquire about available finance options in your region.
Yes, the charger is included in the price. The charger and all tools needed to set up your Surron are included and will arrive with your Surron so you can start riding the same day it arrives.
Usage Questions
Do not use a high-pressure water gun to wash your Surron. When washing, avoid directing water at plug and wire locations, and avoid directing water into the gaps of bearings and other rotating parts.
Regularly check tire wear and air pressure, check the wear of the brake pads and discs, and pay attention to whether the chain is sufficiently lubricated. It is recommended to send your Surron to an authorized dealer for a comprehensive inspection at least every six months.
The Surron is designed with a degree of water resistance. It is recommended that the wading depth does not exceed the motor. The chain and bearings should be maintained promptly after riding through water.
Protection functions include: brake power-off protection, tipping power-off protection, side stand power-off protection, overcurrent protection, overvoltage protection, over-temperature protection, overcharge protection, over-discharge protection, stall protection, and handlebar overrun protection.
Different models may have different protection functions. Please refer to the specifications for your specific model.
You can adjust the E setting in the instrument. There are 6 sliding power recovery levels from 0 to 5.
You can adjust the B setting in the instrument. There are 6 brake assist levels from 0 to 5.
It is recommended to use your Surron within the range of 0 degrees C to 40 degrees C. Temperatures too high or too low can easily damage the battery or activate the protection function.
When the battery is fully charged, the program disables both sliding kinetic energy recovery and braking kinetic energy recovery in order to protect the battery. When the battery level drops to an appropriate level, these functions will be automatically restored.
It is recommended to contact your authorized Surron dealer promptly.
It is recommended to stop using your Surron immediately and contact your authorized Surron dealer.
The Surron has a tilt power-off function. A large jump may cause the sensor to swing too far and trigger the power-off protection. It will return to normal after restarting.
The Surron features Surron's self-developed off-road traction control system. There is an ASR activation switch on the back of the left combination switch. Pressing it temporarily activates ASR control. Clicking it three times in a row turns the ASR function on or off. There is an R/S button on the front of the left combination switch. Clicking it once displays the current ASR intervention level. Double-clicking quickly switches the ASR intervention level.
Check the distance between the front and rear wheel speed sensors and the wheel speed encoder. Too large a gap will prevent the wheel speed sensor from recognising the wheel speed signal. Incorrectly modified tires may also cause abnormal wheel speed signals.
The Surron has a reverse function. In the READY state, long press the R/S button on the left combination switch and turn the throttle. The reverse speed will be adjusted according to the throttle opening.
If the brake system has overheated due to intense riding, it will recover automatically after cooling down. In other cases, please stop riding immediately and contact your authorized Surron dealer.
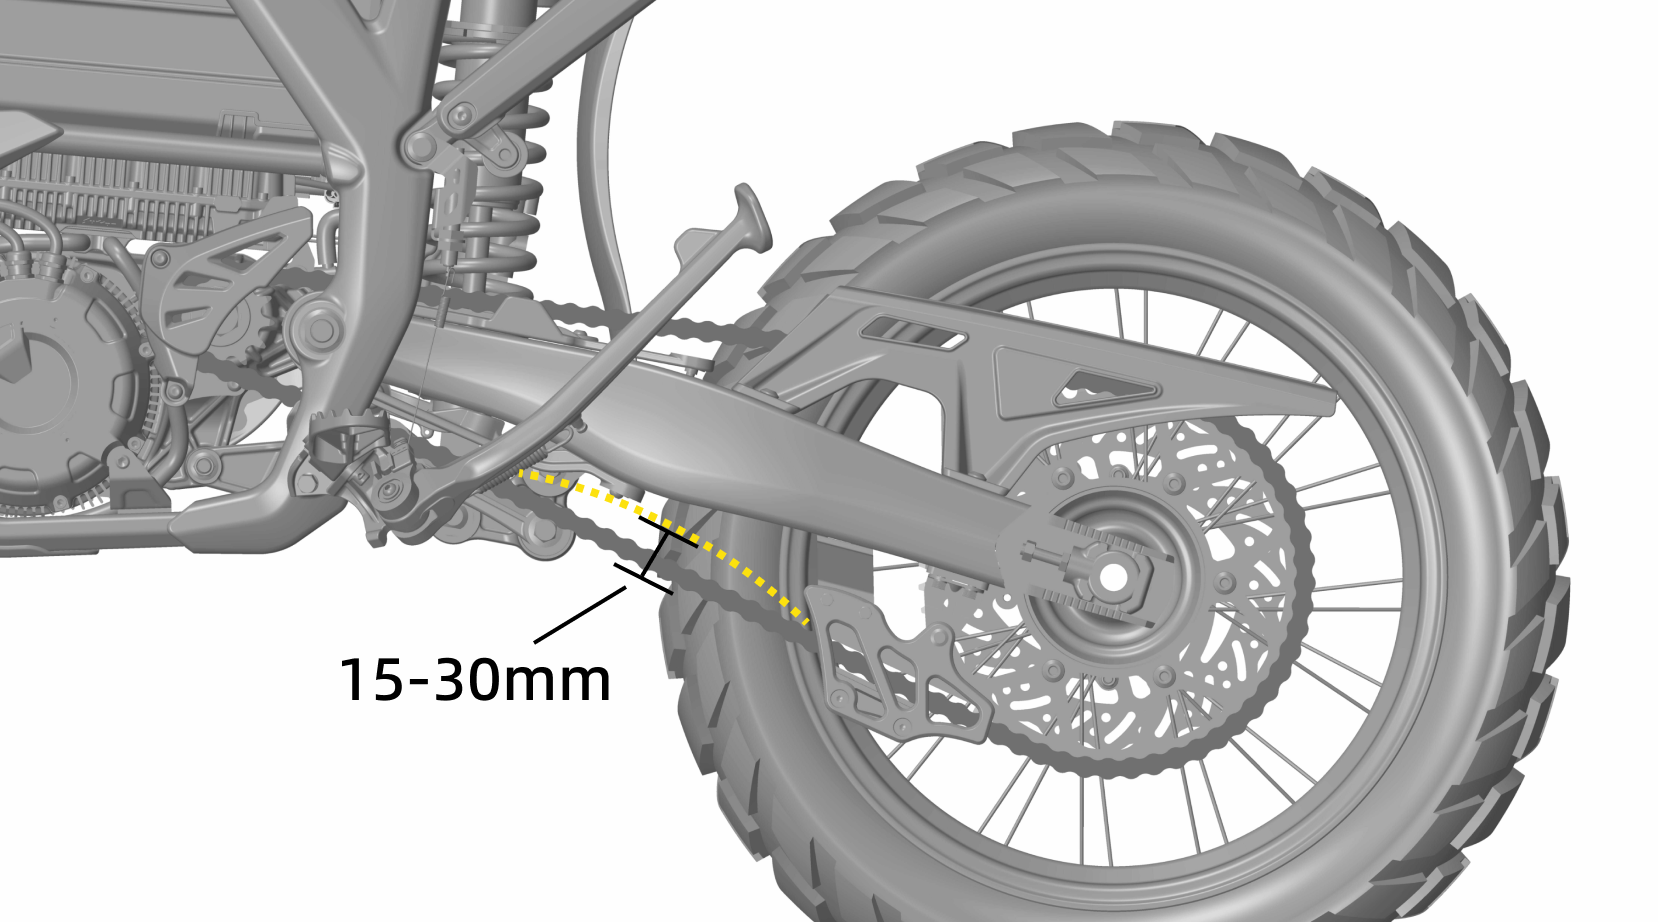
The two models use different swingarm designs. The chain on the Storm Bee must be kept with a certain amount of slack for normal operation. Please follow the owner's manual instructions for adjustment strictly. If the chain is too tight there is a risk of breakage, and if it is too loose the chain may come off.
The two models use different swingarm designs. The chain on the Storm Bee must be kept with a certain amount of slack for normal operation. Please follow the owner's manual instructions for adjustment strictly. If the chain is too tight there is a risk of breakage, and if it is too loose the chain may come off.
The factory configuration of the Surron cannot be changed in this way.
Please avoid charging your Surron in the rain.
Off-road tire pressures are relatively low. To prevent the outer tire and rim from moving relative to each other and damaging the inner tube, a tire clamp is fitted to secure the outer tire. Some Surron electric off-road models are fitted with tire clamps.
You can order original Surron spare parts through your authorized Surron dealer or visit sur-ron.co.nz for more information.
Under normal ambient temperature, the charging time for this battery pack is approximately 4.5 hours. Turn the power off immediately after full charging. The Surron uses a high-performance high-rate battery pack, which can be used in an ambient temperature range of -20 degrees C to 50 degrees C. Best performance is achieved between 10 and 30 degrees C. Temperatures too high or too low will affect battery pack performance and service life. Do not use the Surron at temperatures outside the allowable range. Do not charge the battery below 0 degrees C.
Modification Questions
The original handlebar uses a 28.5mm installation specification. Please use a handlebar suited for an off-road motorcycle. If you modify it yourself, please make sure you fully understand the risks involved.
There are several tire options available:
Forest version (off-road tires): front 80/100-21, rear 100/90-18
Road version (slick tires): front 110/70-17, rear 140/60-17
All-terrain version: front 110/80-19, rear 140/70-17
Original tires are specially customized. Replacing them with other tires may affect performance and can cause power abnormalities. Please make sure you fully understand the risks before modifying.
It is strictly forbidden to modify the original frame, swingarm, power system, battery, controller, and motor. Any such modifications will automatically void the manufacturer's warranty and the risk shall be borne by the user.
Fault Questions
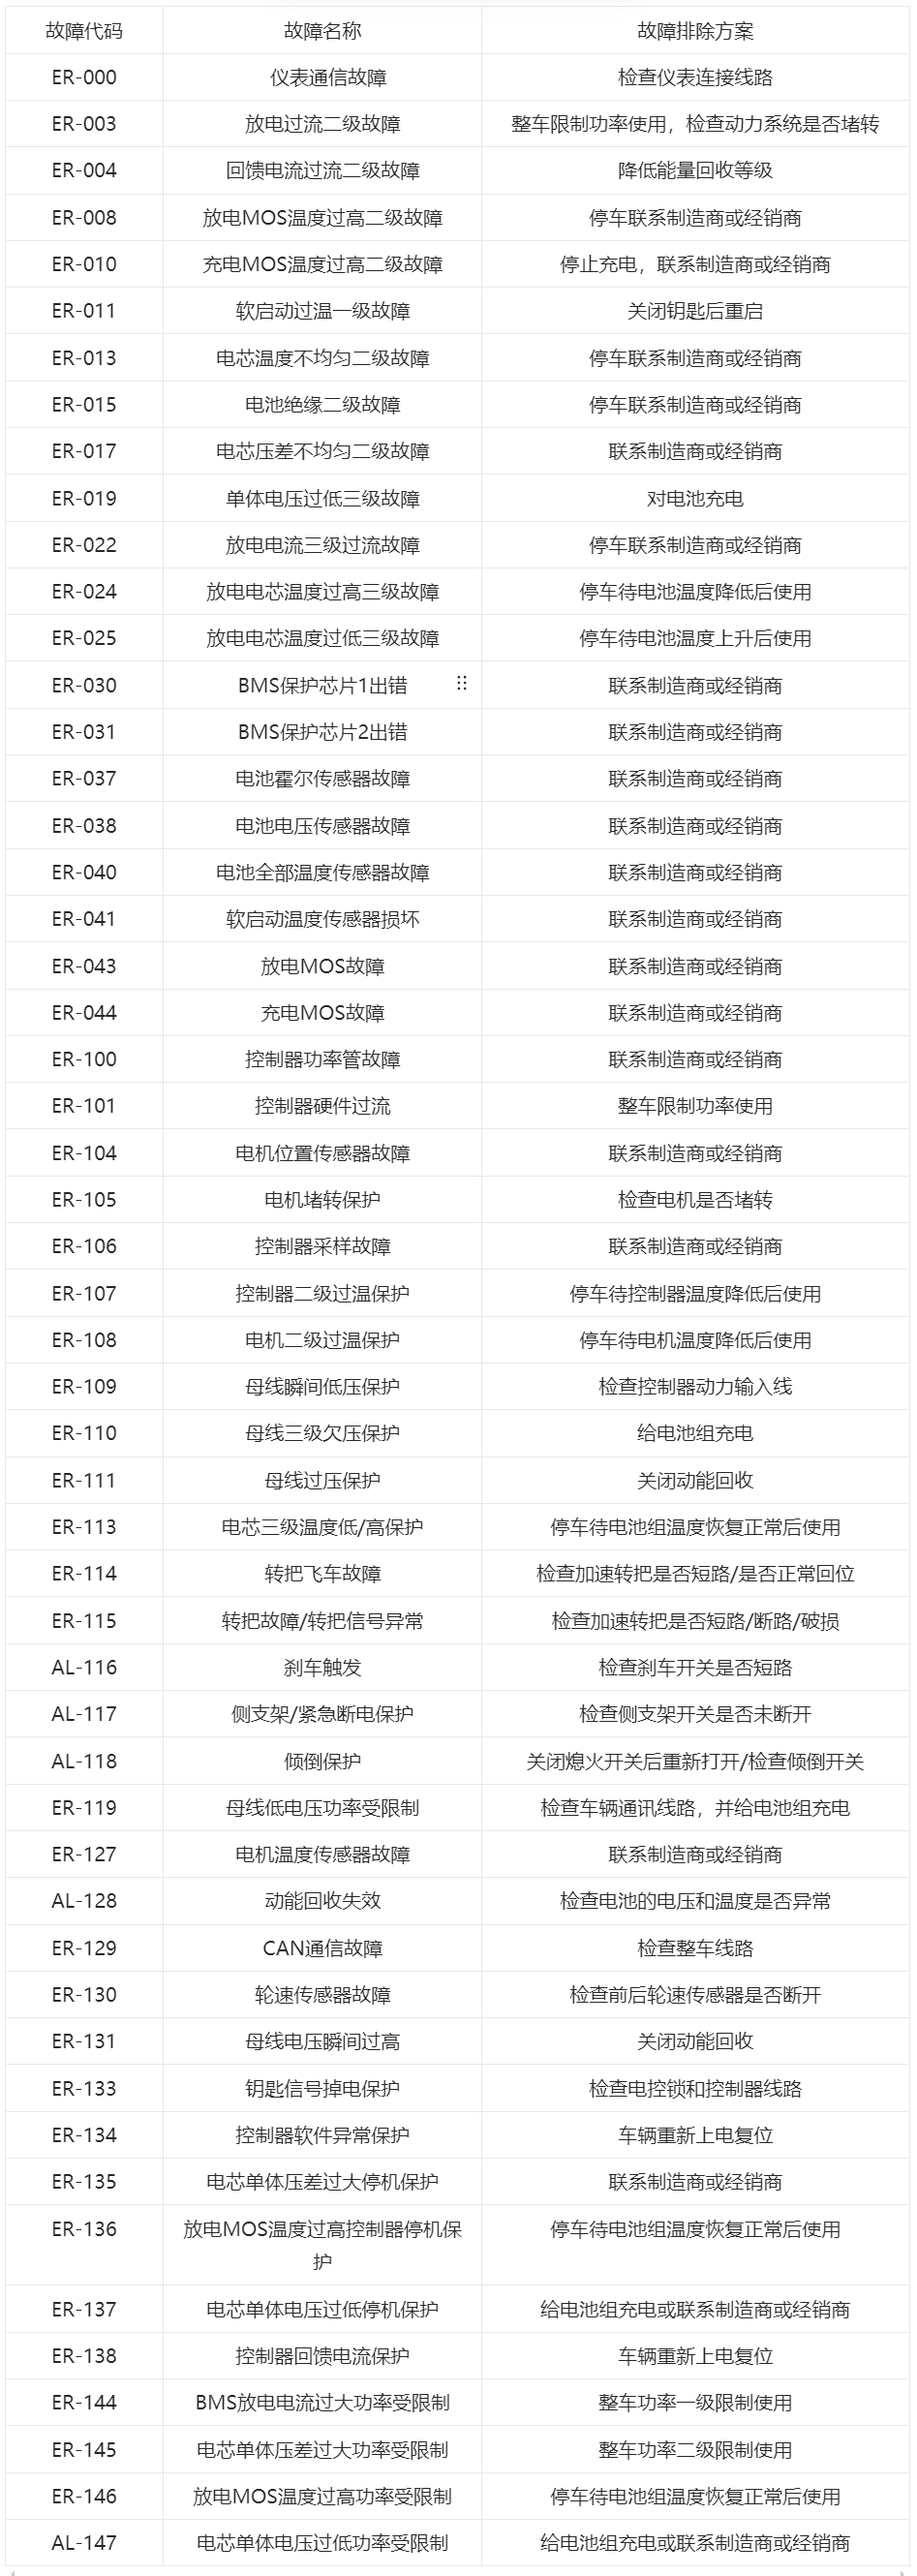
It is recommended to save the fault code table to your phone. After a fault occurs, read the fault code to immediately understand the fault status. Some faults can be resolved through simple steps or may self-recover. If the fault cannot be resolved, please contact your authorized Surron dealer immediately.
Regularly check tire wear and air pressure, check the wear of the brake pads and discs, and pay attention to whether the chain is sufficiently lubricated. It is recommended to send your Surron to an authorized dealer for a comprehensive inspection at least every six months.
Check the wear of the brake pads and discs. If replacement is needed, do so promptly. Check whether the brake caliper is correctly centred, whether there are foreign objects on the brake pads, whether the discs are deformed, and whether the discs and pads are contaminated with oil. If the issue cannot be resolved, please visit your authorized Surron dealer.
Please contact your authorized Surron dealer for inspection immediately. There may be insufficient fluid in the brake master cylinder or oil leakage from the master cylinder piston.
Check the tire wear. If tires have been stored for too long, the rubber will age. It is recommended to replace tires after one year regardless of whether they have been used or not. Excessive air pressure will also reduce grip. Please ensure that the air pressure is within the appropriate range (different tires have different pressure ranges). Different ground conditions and temperatures will also significantly affect tire grip.
Check whether the spokes are loose, check whether the axle is tightened to the specified torque, check whether the bearings are severely worn, and check whether the tires are abnormal.
Check the belt condition. The belt timing teeth may be damaged or the belt may be broken.
Please adjust the chain tension appropriately to ensure that the free movement of the chain is between 3.5 and 4.5cm.
Make sure the chain is properly lubricated and check each link for deformation or damage.
Replace damaged spokes and have them re-tensioned by a professional.
Check that both sides of the fork are parallel. Loosen the spring preload, reduce the compression damping, and perform maintenance on schedule.
Check whether the rear suspension linkage pivots move smoothly. Loosen the spring preload but do not allow the spring to become loose. Reduce the compression damping and perform regular maintenance.
Check the exterior for any foreign objects rubbing against it. If the sound comes from the suspension itself, please visit your authorized Surron dealer for inspection as soon as possible.
If you have confirmed there is no other source of oil stains, please visit your authorized Surron dealer for inspection as soon as possible. A thin oil film on the inner suspension tube is normal. Please take note of the distinction.
Check the battery cover for damage and whether the rubber pad is missing or displaced. If everything is normal, make sure there is sufficient pre-pressure on the battery when the battery cover is locked.
Turn off the key, stand the Surron upright, check whether the front fork legs are parallel, check whether the handlebars are aligned or deformed, check whether the brake lever angle has changed, check whether the braking function is normal, check whether the brake disc and sprocket are deformed, and check whether the footpegs and brackets are damaged or deformed. Check whether the throttle handle is damaged or operating smoothly, and finally turn on the key to check whether the Surron is working properly.
Loosen all the fastening screws of the upper fork clamp, remove the upper clamp, tighten the headset bearing adjustment bolt, ensure that the headset gap is zero and there is no obvious stiffness in the steering rotation. Then reinstall the upper clamp, first tightening the upper clamp pinch bolt to 30N.m and then tightening the front fork pinch bolt to 28N.m.
Stop using the Surron immediately, check the wear of the brake pads and discs, check for brake fluid leaks, and observe the fluid level through the reservoir sight glass. If you are unable to determine the cause, please visit your authorized Surron dealer as soon as possible.
Check whether the throttle is positioned too far inward, causing friction between the throttle and the handlebar end, and whether there is any foreign matter between the throttle and the handlebar.
First, check whether the GPS IoT card account is in arrears. Please contact your authorized Surron dealer or visit sur-ron.co.nz for assistance.
When the hardware is functioning normally, the water cooling system will not activate unless the controller temperature reaches the programmed threshold conditions.
Daily Maintenance
Please refer to the owner's manual for requirements.
Other Questions
Connecting Your Surron
Tool Usage
When using fastening tools, ensure the tool fully engages the fastener. Larger wrenches require one hand to stabilise the tool to prevent slipping.
Percussion tools are only used as an auxiliary tool for installation. It is strictly forbidden to directly strike parts. If direct contact is required, protect the part with a softer material pad.
Torque wrenches are precision tools that must be operated in strict accordance with the instructions for use. Ensure the accuracy of torque readings at all times.
Pay attention to selecting power tools with appropriate torque. High-torque power wrenches can easily damage bolts or parts during operation. It is strictly forbidden to use high-torque power wrenches to tighten bolts and nuts of smaller sizes (10mm and below). When tightening large bolts and nuts, power tools should only be used for quick pre-tightening. A torque wrench should be used for final tightening to ensure the correct torque is achieved.
Pay attention to the difference between mineral brake fluid and DOT brake fluid systems. Tools and fluids cannot be mixed between systems.
Maintenance Tips
Regularly check the appearance of the battery pack and all high-voltage wiring harnesses for cleanliness and damage. Ensure that the battery pack connectors are clean and address any damage to the battery pack immediately.
Regularly check whether the battery pack mounting bracket is securely holding the battery pack to prevent unexpected power loss due to vibration while riding.
Regularly unplug the battery pack output power connector and use a multimeter to check whether the output voltage of the fully charged battery pack is within the normal range.
Warning: Always wear insulating gloves before inspection.
The Surron uses a high-performance high-rate battery pack, which can be used in an ambient temperature range of -20 degrees C to 50 degrees C. Best performance is achieved between 10 and 30 degrees C. Temperatures too high or too low will affect battery pack performance and service life. Do not use the Surron at temperatures outside the allowable range. Do not charge the battery below 0 degrees C.
Under normal ambient temperature, the charging time for this battery pack is approximately 3 hours. Turn the power off immediately after full charging.
When not in use for a long time, charge the battery pack to approximately 60 to 80% capacity for storage, and check the remaining capacity every month. Charge the battery pack once when it drops below 30% to prevent the battery pack from losing activity, which can affect performance and cause damage.
It is strictly forbidden to rinse the battery pack with a high-pressure water gun, and the battery pack must not be submerged in water. Do not ride through water deeper than the centre of the wheel, otherwise water may enter the battery pack, causing an internal short circuit and permanent failure of the battery pack. Clean the battery pack casing with a cloth and a small amount of clean water.
Warning: Do not charge the battery pack below 0 degrees C, otherwise the battery pack will be damaged. Wait until the battery pack temperature rises above 0 degrees C before charging. The maximum allowable charging temperature inside the battery pack is 60 degrees C. If the internal temperature exceeds this, it will not charge until it cools below 60 degrees C. If the battery pack has recently been rapidly discharged due to intense riding, the internal temperature may still be above 60 degrees C even if the ambient temperature is low.
Never short-circuit the connector when cleaning the battery pack. Always charge the battery pack in a well-ventilated location away from flammable materials. If you want to charge your Surron outdoors, please avoid charging in the rain.
Only use the original Surron charger or a manufacturer-specified charger to charge the battery pack. Using unapproved chargers or accessories may cause damage or malfunction of the battery pack, or even cause danger.
The battery pack is only allowed to return to normal temperature naturally. It is prohibited to use other methods to heat or cool the battery pack.
Warning: After the battery pack has been discharged at high power or has been operating under high temperature conditions, it may not be able to charge immediately. The battery pack should cool for 30 minutes or more before charging begins. The battery management system prohibits charging when the internal temperature is high; otherwise the life of the battery pack will be shortened.
If the appearance of the battery pack is damaged, an unusual smell is detected during charging, the battery pack becomes excessively hot, or it still does not show as fully charged after a long time, please stop charging immediately, disconnect the power supply, and contact your authorized Surron dealer immediately.
Check whether the suspension is functioning correctly.
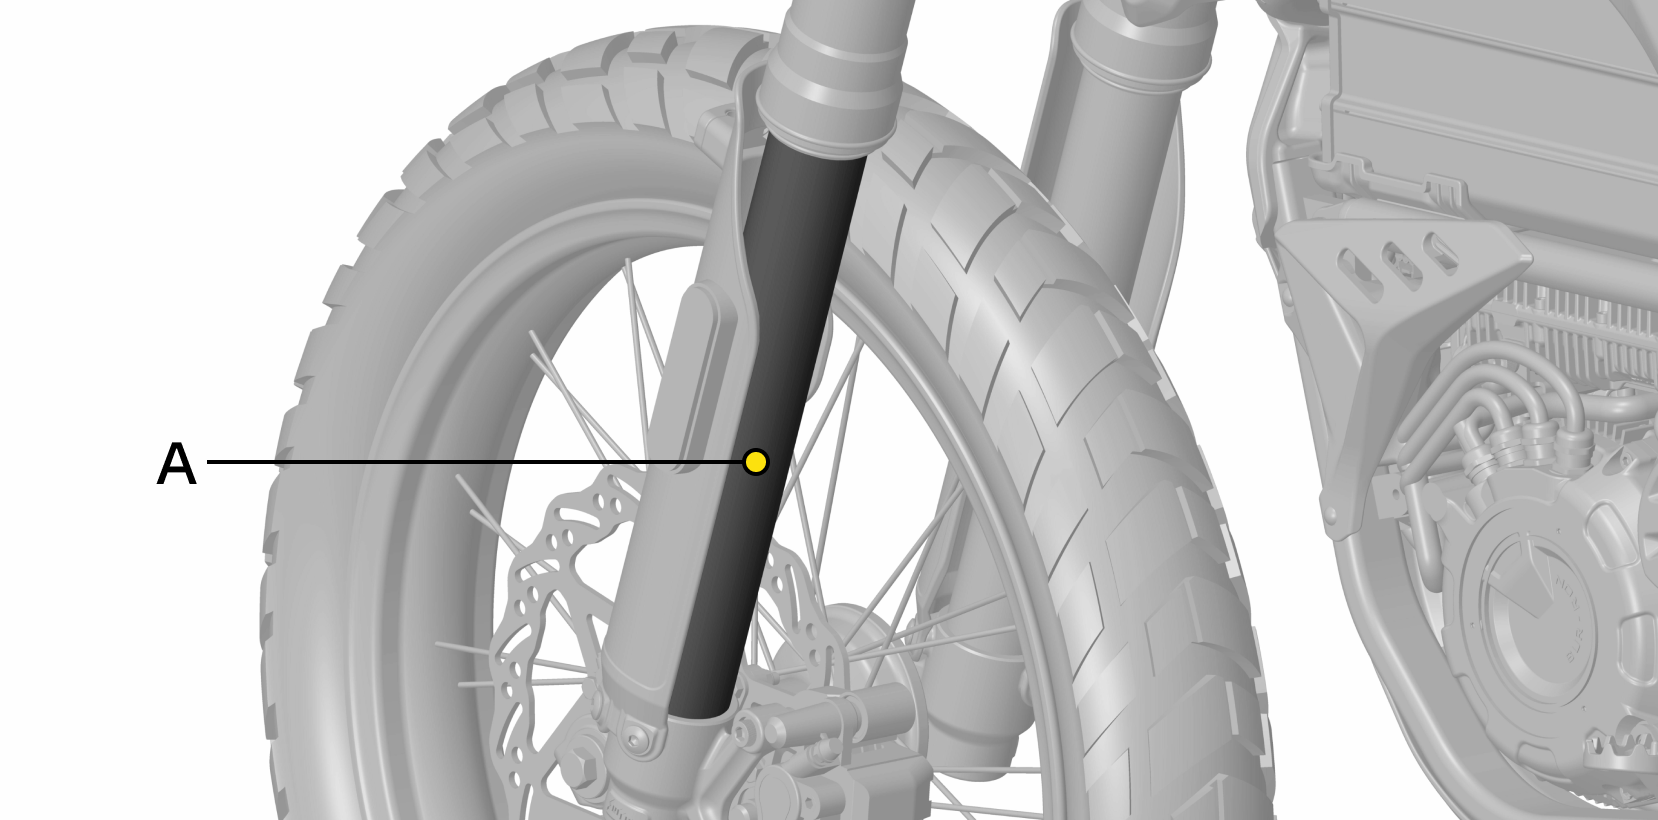
Check whether there are any foreign objects on the suspension inner tube. Keep the inner tube clean and intact in appearance.
Check the dust seal for excessive oil leakage.
Check the outer tube and other components for damage.
Do not disassemble the suspension on your Surron. Follow these steps to lubricate the suspension and keep it in optimal condition:
Remove the protective cover. Clean dust (mud, old lubricant, etc.) from the surface of the fork tube. Apply Surron-approved suspension lubricant evenly to the surface of the front inner tube.
Warning: The suspension on your Surron is not designed to be disassembled. Do not attempt to open the suspension or remove any internal components.
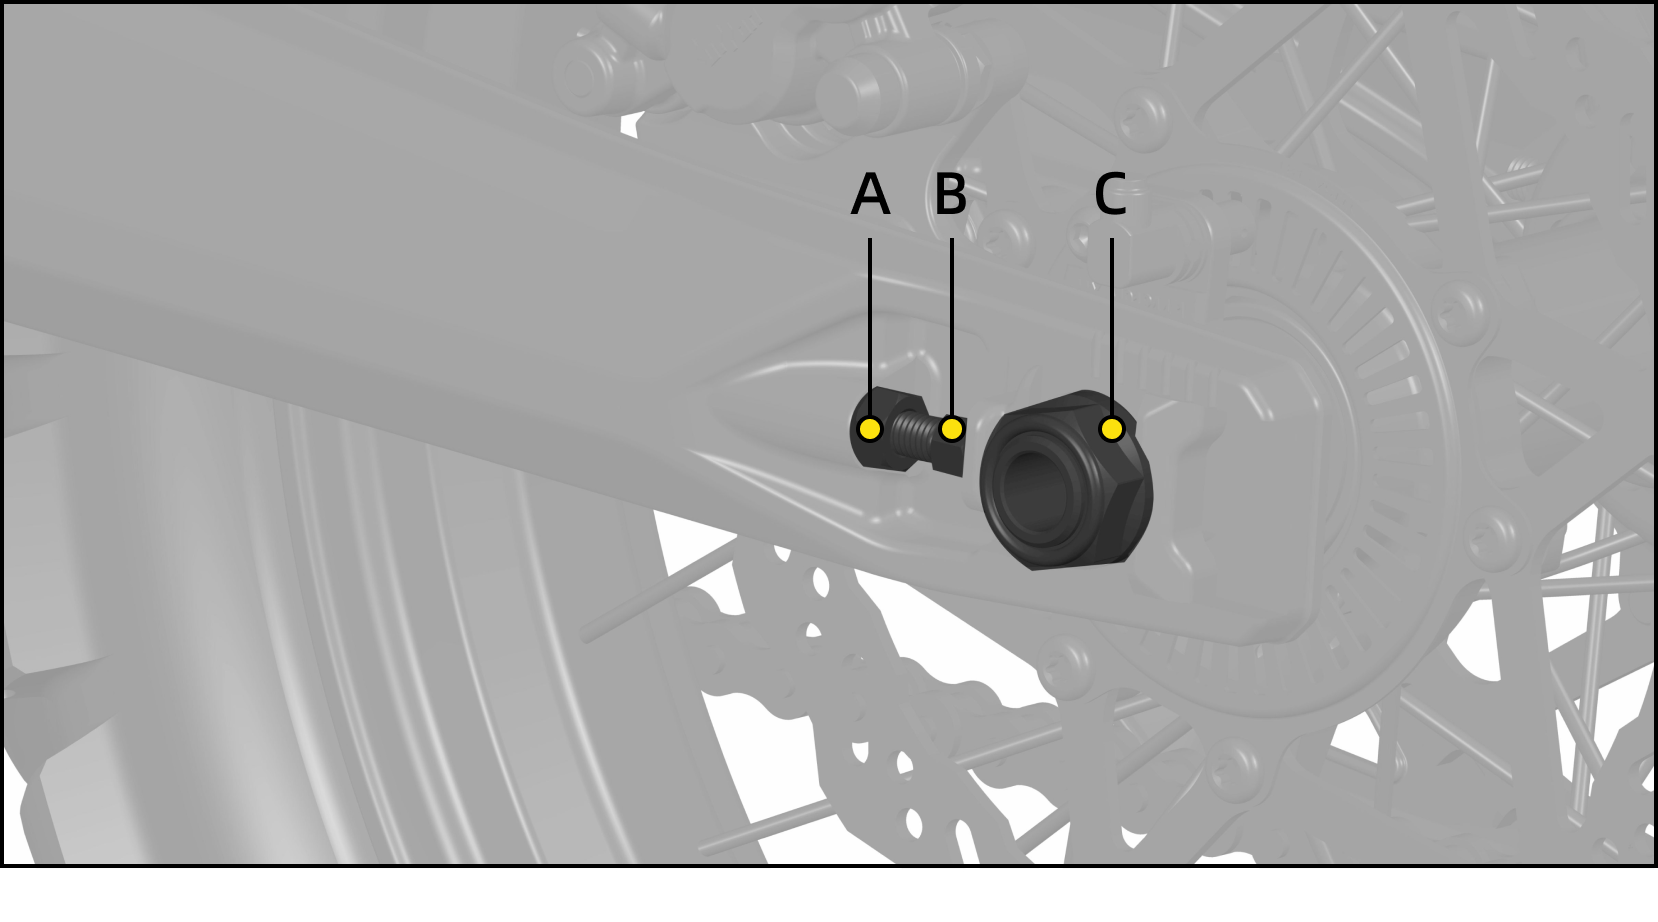
Regularly check whether the gearbox housing seal is intact.
Regularly check the gearbox oil level through sight glass B. If oil needs to be added or changed, open the fill port C to add or change the oil.
Regularly remove the gearbox breather pipe clamp A, remove the breather pipe, and check that it is unobstructed.
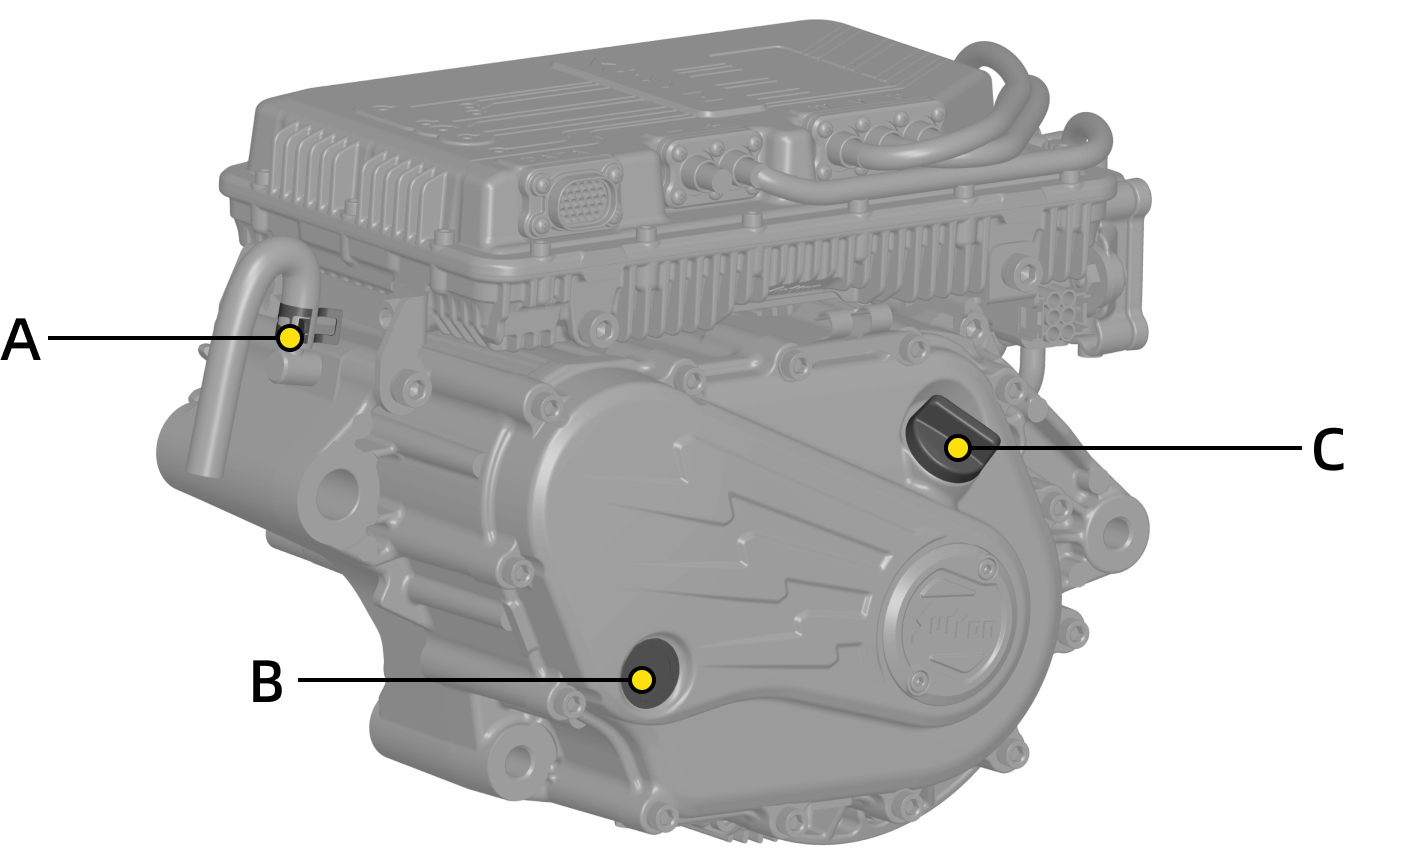
The factory specification for the gearbox oil is 10W-40 SG or higher (300ml). If the riding environment temperature exceeds the standard design range, please select the appropriate oil specification for the actual temperature.
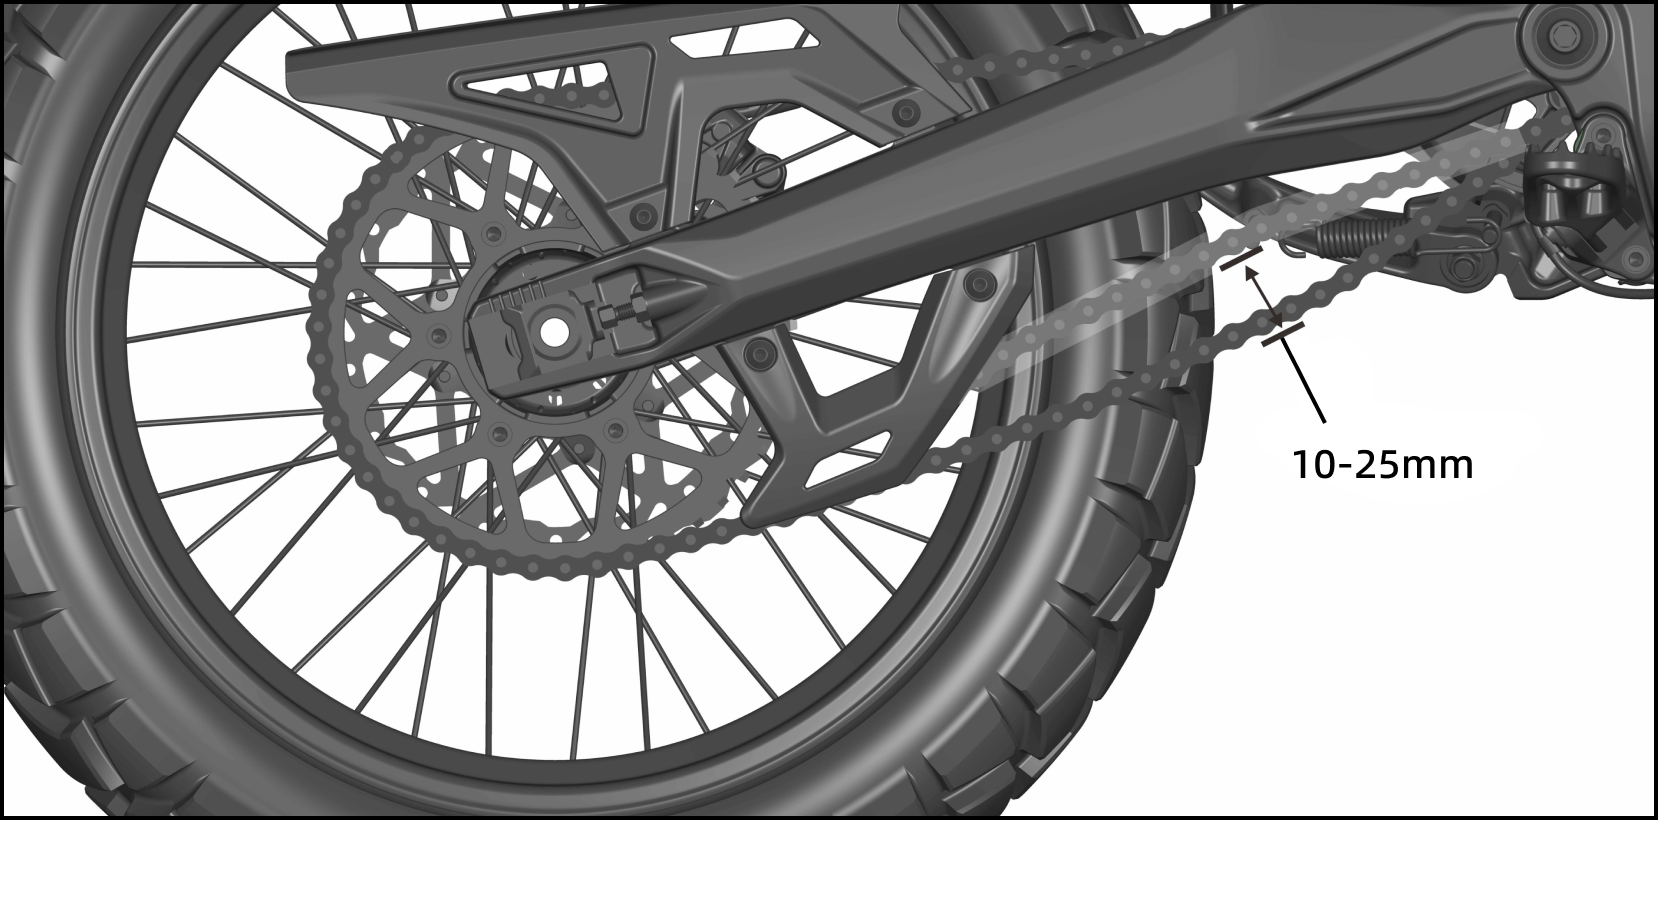
Clean the dirt from the chain after each ride. Maintain proper lubrication by applying a specific chain lubricant. Regularly check the condition of the chain. Place the Surron on a stand so that it is supported from the bottom bracket area with the rear wheel suspended. After rotating the rear wheel a set distance, use a chain wear gauge to check the wear of the chain. If there is significant wear, replace the chain. Regularly check the chain tension (see diagram). Lift the middle of the lower chain run and check visually or with a ruler whether the up and down movement is within 35 to 45mm. If it is outside this range, adjust the chain immediately.
- After removing the key and turning off the kill switch, use a stand to prop up the Surron so that the rear wheel is suspended in the air.
- Loosen the rear axle nut C.
- Loosen the lock nut A of the left and right adjustment bolts B.
- Adjust the left and right adjustment bolts B equally until the chain is within the specified range.
- Tighten the rear axle nut C.
- Tighten the left and right lock nuts A to fix the position of the adjustment bolt B.
- Take a test ride.
- After the test ride, please recheck whether the chain is adjusted correctly and readjust if necessary.
Note: When adjusting the chain, adjust the adjustment bolts on both sides equally.
Place the Surron on a stand so that it is supported from the bottom bracket area and the rear wheel is suspended.
Use a brush and a spray bottle (filled with soapy water) to thoroughly clean large dirt deposits from the chain. Apply degreasing cleaner to the lower chain run and wipe the chain clean with a cloth when finished.
Apply motorcycle chain lubricant at the rear sprocket entry point of the lower chain run. A small amount is sufficient and the chain should not be soaked. Then slowly rotate the rear wheel forward so that the chain lubricant passes through the entire chain, ensuring that the rollers and link connectors are coated.
When applying chain lubricant, avoid contaminating the braking system.
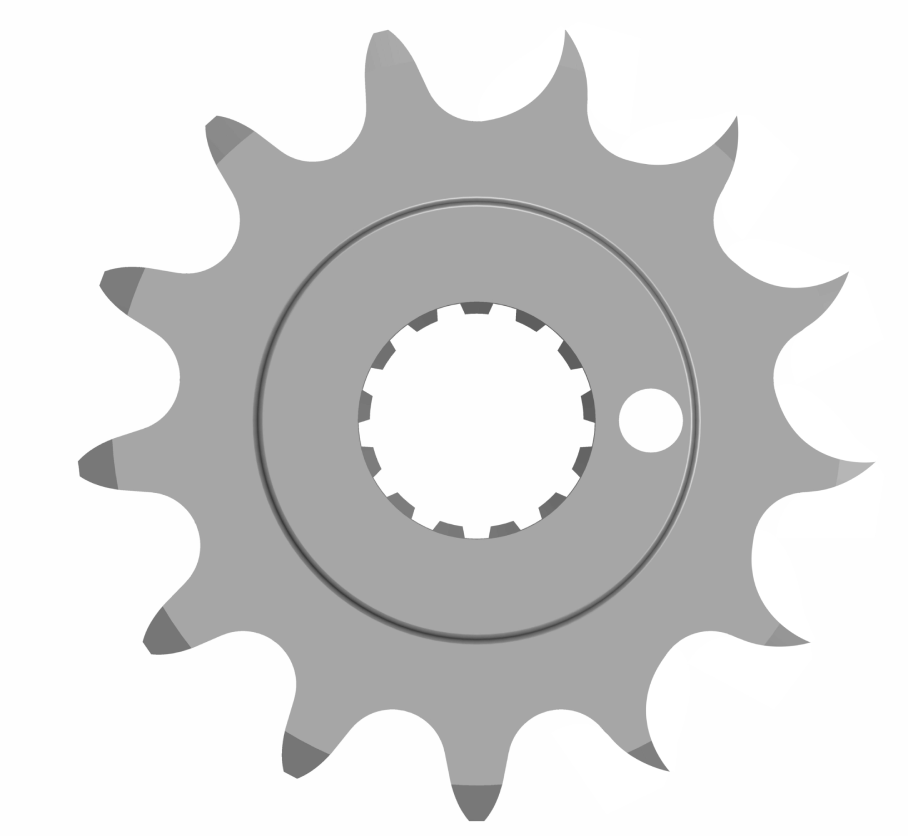
Check the wear of the front and rear sprockets. The image below shows the shape of correct teeth and worn teeth. If the sprocket is in poor condition, it should be replaced.
Before each ride, check whether the tires are damaged by foreign objects.
Regularly check the tire tread depth. If the tread height is less than 2mm, the tread has reached the wear indicator on the centre line of the tire. Replace the tire immediately when it reaches the wear indicator.
Tire pressure checks must be performed when the tires have cooled down. Do not check tire pressure within a few hours of riding.
It is recommended to set the tire pressure to 225kPa for the front and rear wheels on paved roads, and 100 to 150kPa for the front and rear wheels on unpaved roads.
Warning: Riding with incorrect tire pressure can result in:
Unexpected tearing;
Loss of control;
Increased rolling resistance when pressure is too low;
Premature wear;
Pinch flats and punctures.
Place the Surron on a stand so that it is supported from the bottom bracket area. Confirm that the wheel rotates freely and check for lateral or longitudinal oscillation. If oscillation occurs, measure the movement with an auxiliary tool. If it exceeds 1.5mm, check whether the rim is deformed or the bearing is damaged.
If the rim is in good condition, check whether the tire is correctly seated on the rim.
If the rim is undamaged but sits at an angle from vertical, the swingarm may be bent or misaligned. Please return to your authorized Surron dealer for further inspection.
Every time you ride, operate both brake levers several times before riding under power and confirm the braking force feels normal. The piston rod bolt on the brake master cylinder can be used to adjust the compression stroke of the brake lever, thereby adjusting the pad contact point on the disc. Regularly topping up brake fluid and bleeding the brake system can effectively prevent reduced braking force or complete brake failure.
Every time you ride, check whether the brake pads are in normal condition. If the brake pad wear is uneven, the gap is uneven, the wear is severe, or the pads are heavily contaminated, adjust the brake caliper and replace the brake pads promptly. Regularly check that the caliper pistons are functioning correctly and are clean.
Check the brake lines regularly for damage or leakage. If found, replace immediately.
Regularly check that the brake disc working area is at least 1.6mm thick. If it is below this thickness, replace it immediately. The brake disc must be flat and undeformed to ensure proper operation. A warped brake disc will cause irregular braking feel, reduced braking performance, and accelerated brake pad wear.
Place the Surron on a stand so that it is supported from the bottom bracket area. Rotate the wheel and observe the gap between the disc and brake pad to check for indentations or bending. Slight lateral deflection is acceptable as long as the disc is not contacting the brake pad. If the disc is rubbing the brake pad at a certain point, it is recommended to use a brake disc correction tool to adjust it or replace the disc immediately.
The Surron is equipped with a parking brake that should prevent the rear wheel from rolling when the rear brake parking lever (located on the left handlebar) is in the parked position. Please check the parking brake regularly.
Note: Do not touch the braking surface of the disc or pad with bare hands, as the grease from your hands may reduce braking effectiveness. Do not allow oil or brake fluid to contact the brake disc. If this happens, remove the disc and clean it thoroughly with isopropyl alcohol. Do not adjust the push rod adjustment screw on the brake lever at will, as this will prevent the brake circuit from replenishing correctly as the pads wear. If the brake system performance declines or fails, please contact your authorized Surron dealer immediately.
Warning: When using a new brake system or new brake pads, initial braking force may feel reduced. Please bed in the brake pads and discs at low speed in a safe environment to ensure the brake system provides normal braking force. If the parking brake cannot effectively lock the rear wheel, please contact your authorized Surron dealer promptly.
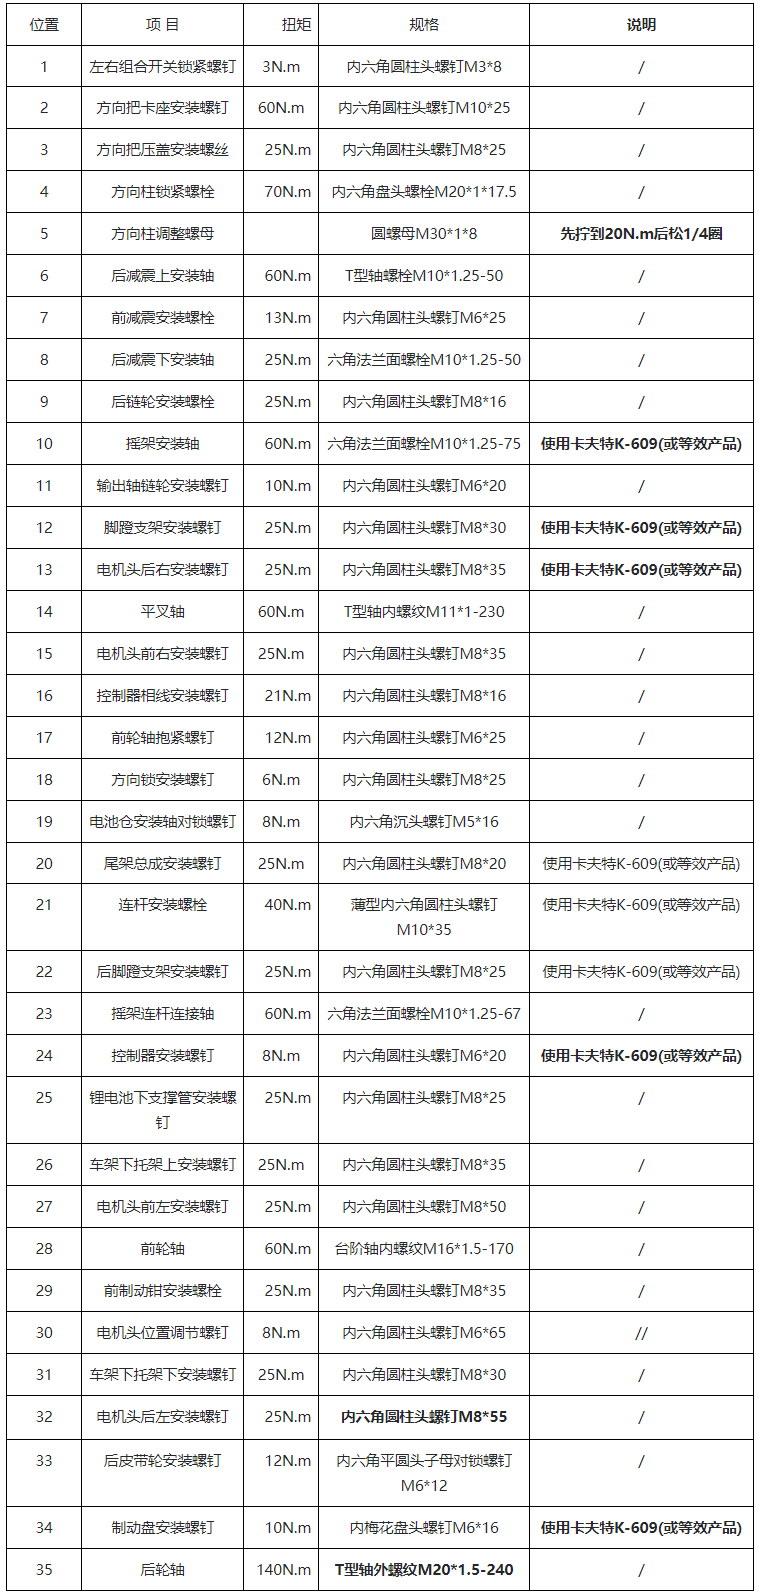
The tightening torque values of bolts and nuts on all important components of the Surron should be checked regularly.
Regularly check whether the cable ties, clamps, and retaining clips in all areas are functioning normally.
Note: How to adjust the headset bearing adjustment nut:
- Place the Surron on a repair stand with the front wheel off the ground.
- Loosen the headset locking bolt and the front fork mounting bolts on the upper fork clamp.
- Tighten the headset adjustment nut to 20N.m and then back it off by 1/4 turn.
- Tighten the headset locking bolt and the front fork mounting bolts on the upper fork clamp.
- Check whether the handlebars rotate normally. If necessary, repeat the above steps.
Fault Guidance
Get support
After-sales engineers are ready to provide you with solutions

Postsale Engineer
After-sales Customer Service Surron
Phone: +64 9 200 4876
Monday to Friday: 9am to 6pm
