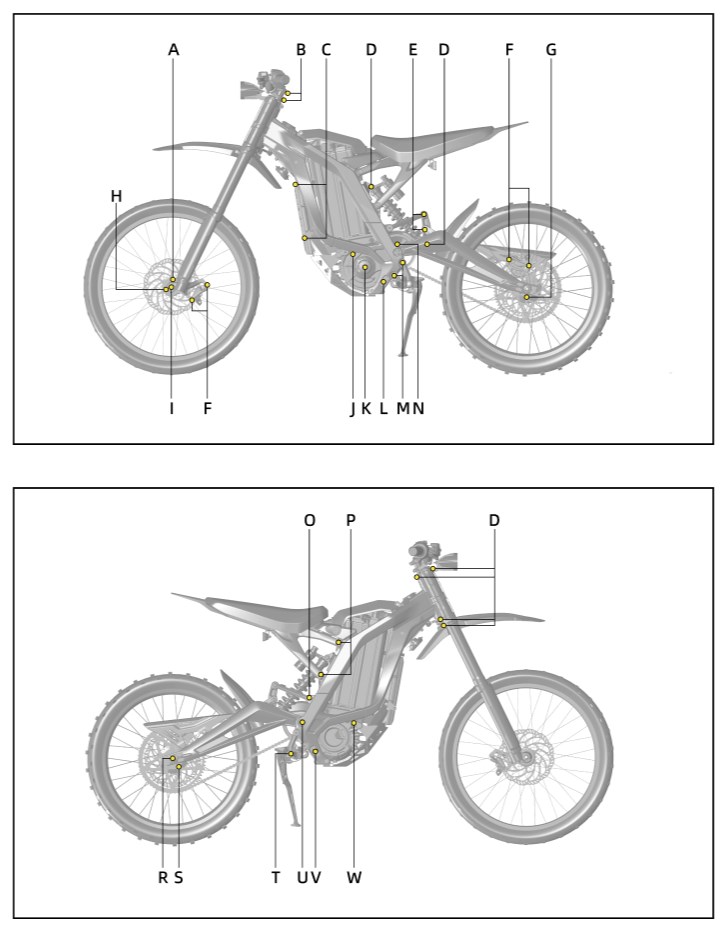
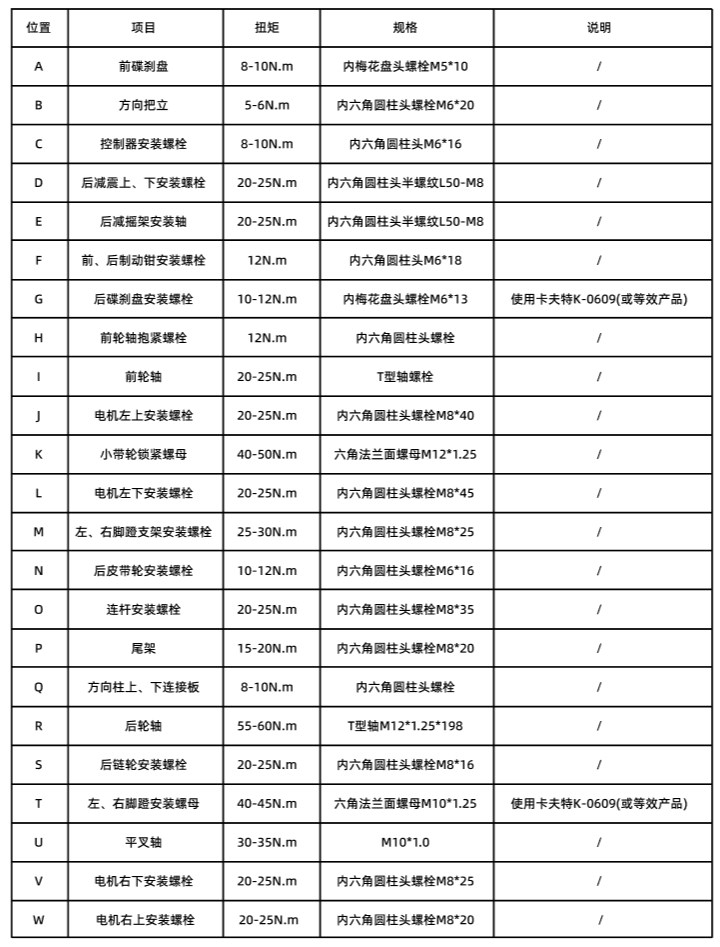
Light Bee

Getting the New Bike
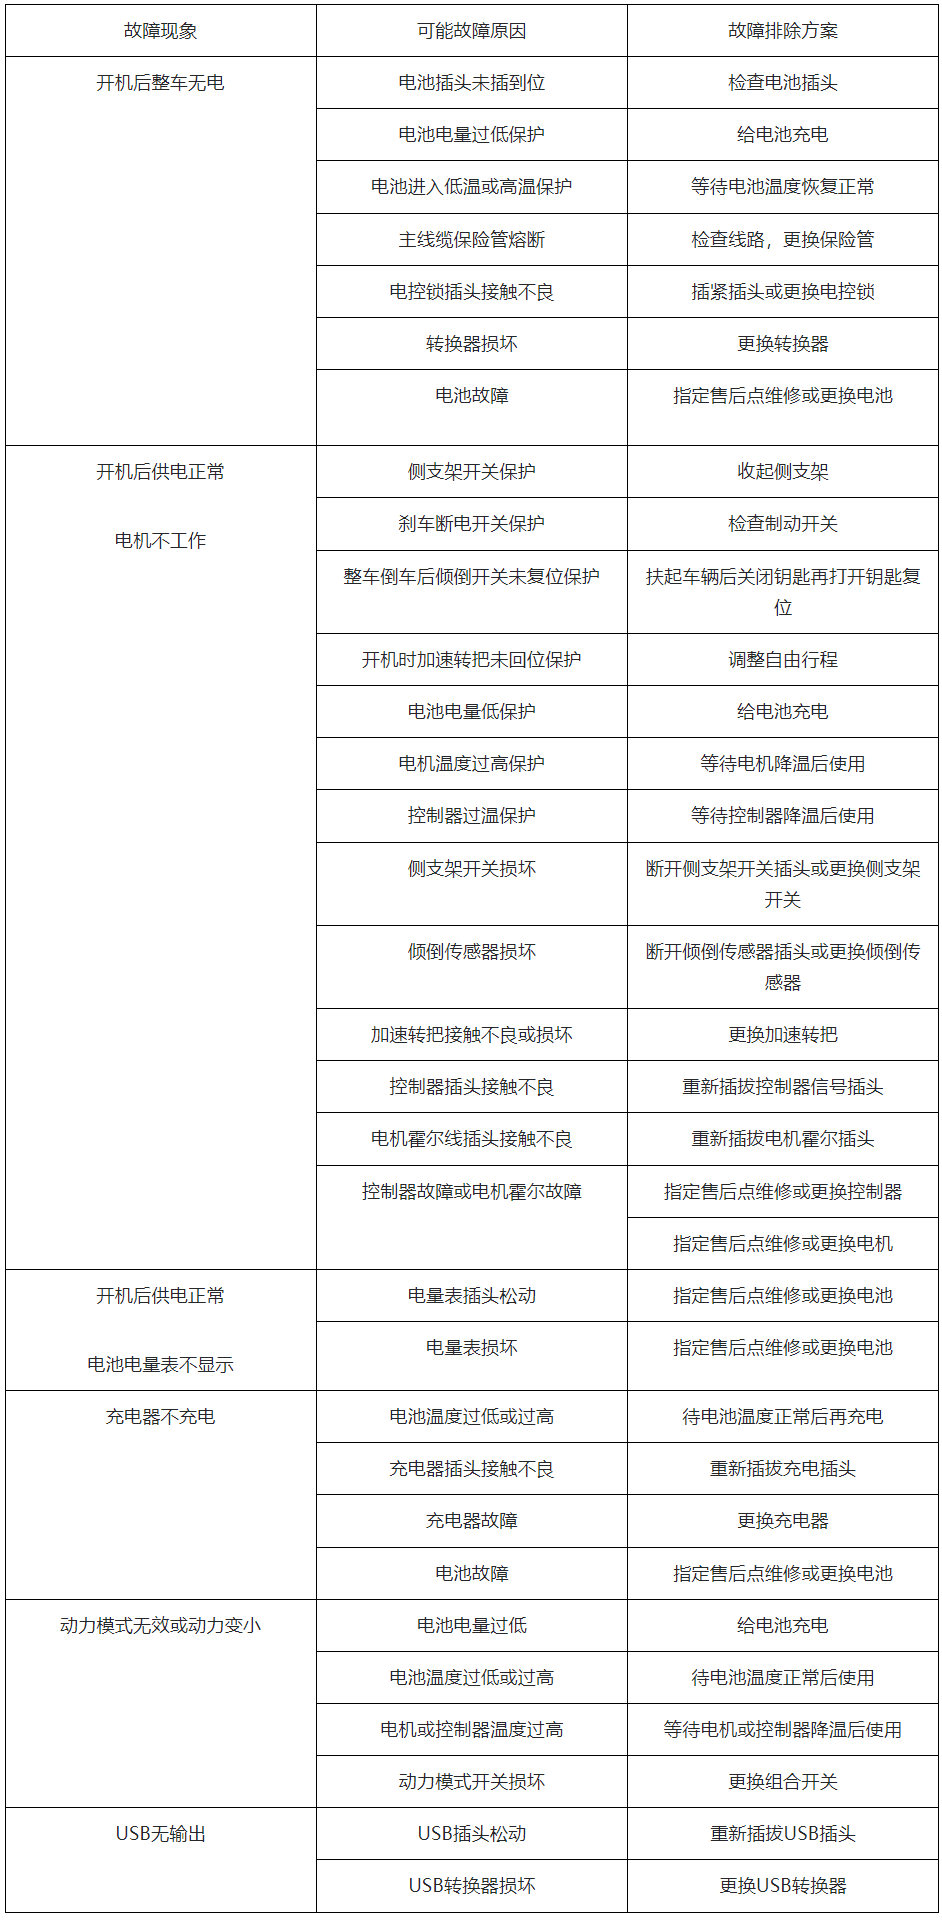
| Fault Symptom | Possible Cause | Troubleshooting Solution |
|---|---|---|
| No power after turning on | Battery connector not fully inserted | Check the battery connector |
| Battery low-power protection activated | Charge the battery | |
| Battery entered low/high temperature protection | Wait for battery temperature to return to normal | |
| Main cable fuse blown | Check wiring, replace fuse | |
| Motor controller connector poor contact | Re-plug connector or replace controller | |
| Converter damaged | Replace converter | |
| Battery failure | Go to authorized dealer for repair or battery replacement | |
| Power on normal, motor not working | Side stand switch protection | Retract the side stand |
| Brake cutoff switch protection | Check the brake switch | |
| Tilt-after-fall switch not reset | Pick up the bike, close the key, then reopen the key to reset | |
| Throttle not in resting position at startup | Adjust throttle free play | |
| Battery low-power protection | Charge the battery | |
| Motor over-temperature protection | Wait for motor to cool down before use | |
| Controller over-temperature protection | Wait for controller to cool down before use | |
| Side stand switch damaged | Disconnect side stand switch connector or replace side stand switch | |
| Tilt sensor damaged | Disconnect tilt sensor connector or replace tilt sensor | |
| Throttle poor contact or damaged | Replace throttle | |
| Controller connector poor contact | Re-plug controller signal connector | |
| Motor Hall sensor connector poor contact | Re-plug motor Hall sensor connector | |
| Controller failure or motor Hall sensor failure | Go to authorized dealer for repair or replace controller | |
| Go to authorized dealer for repair or replace motor | ||
| Power on normal, battery level not displayed | Gauge connector loose | Go to authorized dealer for repair or replace battery |
| Gauge damaged | Go to authorized dealer for repair or replace battery | |
| Charger not charging | Battery temperature too low or too high | Wait for battery temperature to return to normal, then charge |
| Charger connector poor contact | Re-plug the charger connector | |
| Charger failure | Replace charger | |
| Battery failure | Go to authorized dealer for repair or replace battery | |
| Power mode ineffective or power reduced | Battery charge too low | Charge the battery |
| Battery temperature too low or too high | Wait for battery temperature to return to normal before use | |
| Motor or controller temperature too high | Wait for motor/controller to cool down before use | |
| Power mode switch damaged | Replace combination switch | |
| No USB output | USB connector loose | Re-plug USB connector |
| USB converter damaged | Replace USB converter |
You can go to the local dealer for a bike test ride. You will need to provide a motorcycle driving license and sign an agreement to test ride.
Please go to the Surron official website at: https://sur-ron.co.nz/
The 2024 Light Bee 3C version is an electric motorcycle and needs to be registered with a motorcycle yellow license plate. Please consult the local traffic management department. Some versions of different models cannot be registered.
The Light Bee is shipped globally in cartons on pallets, optimized to reduce plastic use. Inside the box, you will find everything needed to set up your bike, including all relevant tools. If you pick up your bike from one of our dealers, they will set it up for you beforehand.
Check the channel where you placed the order (Qiulong Tmall flagship store, Qiulong JD flagship store, offline dealers). Delivery time outside Tibet and Xinjiang is about 3-5 days; in Tibet and Xinjiang, it is about 5-10 days.
A motorcycle driver's license (e.g., E or D license) is required. Qiulong Qingfeng 3C, Jifeng 3C, and Baofeng 3C are all electric motorcycles.
You can choose the installment option on the Qiulong JD flagship store or the Qiulong Tmall flagship store. Currently, only Huabei and JD Baitiao provide financial solutions.
Yes, the Light Bee's charger is included in the price. The charger and all tools needed to set up the bike are included, so you can start riding the day it arrives.
The 2024 Light Bee 3C version is available in two colors: Moon Rock Black and Phantom Purple.
Using the Bike
Check the tire pressure (25-32 psi recommended) and ensure all screws are tight. Make sure to have enough battery level, turn on the air switch and key switch, and retract the side stand to start riding. Remember to wear a helmet and other protective gear, and obey local traffic laws.
The power supply requirements are marked on the charger. Strictly follow the requirements and steps in the manual, and refer to the local mains parameters. Do not use the charger if it does not match the local mains.
Ensure the trip distance is within the bike's range. Start considering returning when the battery level drops below 60%. At 20 km/h, you can ride about 120 km (in ideal conditions). Factors like altitude, rapid acceleration, insufficient air pressure, lack of maintenance, and extreme temperatures can affect range. It's recommended to ride in a familiar area and estimate the range based on electricity consumption.
Keeping a constant speed of 20 km/h can help achieve the longest range. Maintain gentle acceleration and a low average speed to extend the range as much as possible. Note: When off-roading, the range will be reduced according to different road conditions.
The bike is designed to have a certain level of water resistance. It is recommended that the depth of wading should not exceed the motor. Make sure to maintain the chain and bearings after wading and riding.
Protection features include brake override, tilt switch, side stand switch, overcurrent protection, overvoltage protection, over-temperature protection, overcharge protection, overdischarge protection, locked-rotor protection, and throttle misoperation protection. Protection functions may differ according to different models.
Due to regulatory requirements, the lights have no switch and are always on after the bike is powered on. The overall power consumption is negligible.
It is recommended to use the bike in the range of 0℃-40℃. Too high or too low temperatures can damage the battery or activate the protection function.
The power systems vary by model: the Light Bee S uses a 48V battery, while the Light Bee X uses a 60V battery. Batteries of different voltage from the original bike are prohibited.
When the battery level is high, to protect it from overcharging, the controller turns off this function. It will automatically restore when the battery drops to a suitable level.
Please contact the authorized dealer as soon as possible.
The Light Bee is equipped with a tilt switch, which might be triggered after big jumps. The bike will return to normal after being powered on again.
The Light Bee has a dump power-off function. A large jump may cause the sensor to swing too much and trigger the power-off protection function. It will return to normal after restarting the vehicle.
If the reduced braking force is caused by high temperature of the brake system after intense riding, it can recover by itself after cooling. In other cases, please stop riding immediately and contact the authorized dealer.
You can order original spare parts from the Tmall Qiulong Flagship Store and JD Qiulong Flagship Store. Please contact customer service if the product is not listed.
The charging time of the battery pack is about 4-5 hours at 25°C ambient temperature. Power should be cut off immediately after fully charged. The Light Bee uses a high-performance battery pack that can be used in ambient temperatures of -15 to 40°C, with the best working condition between 10°C and 30°C. Extreme temperatures will affect battery performance and lifespan. Do not use the battery pack outside the allowable range, and do not charge it below 0°C.
Modification Questions
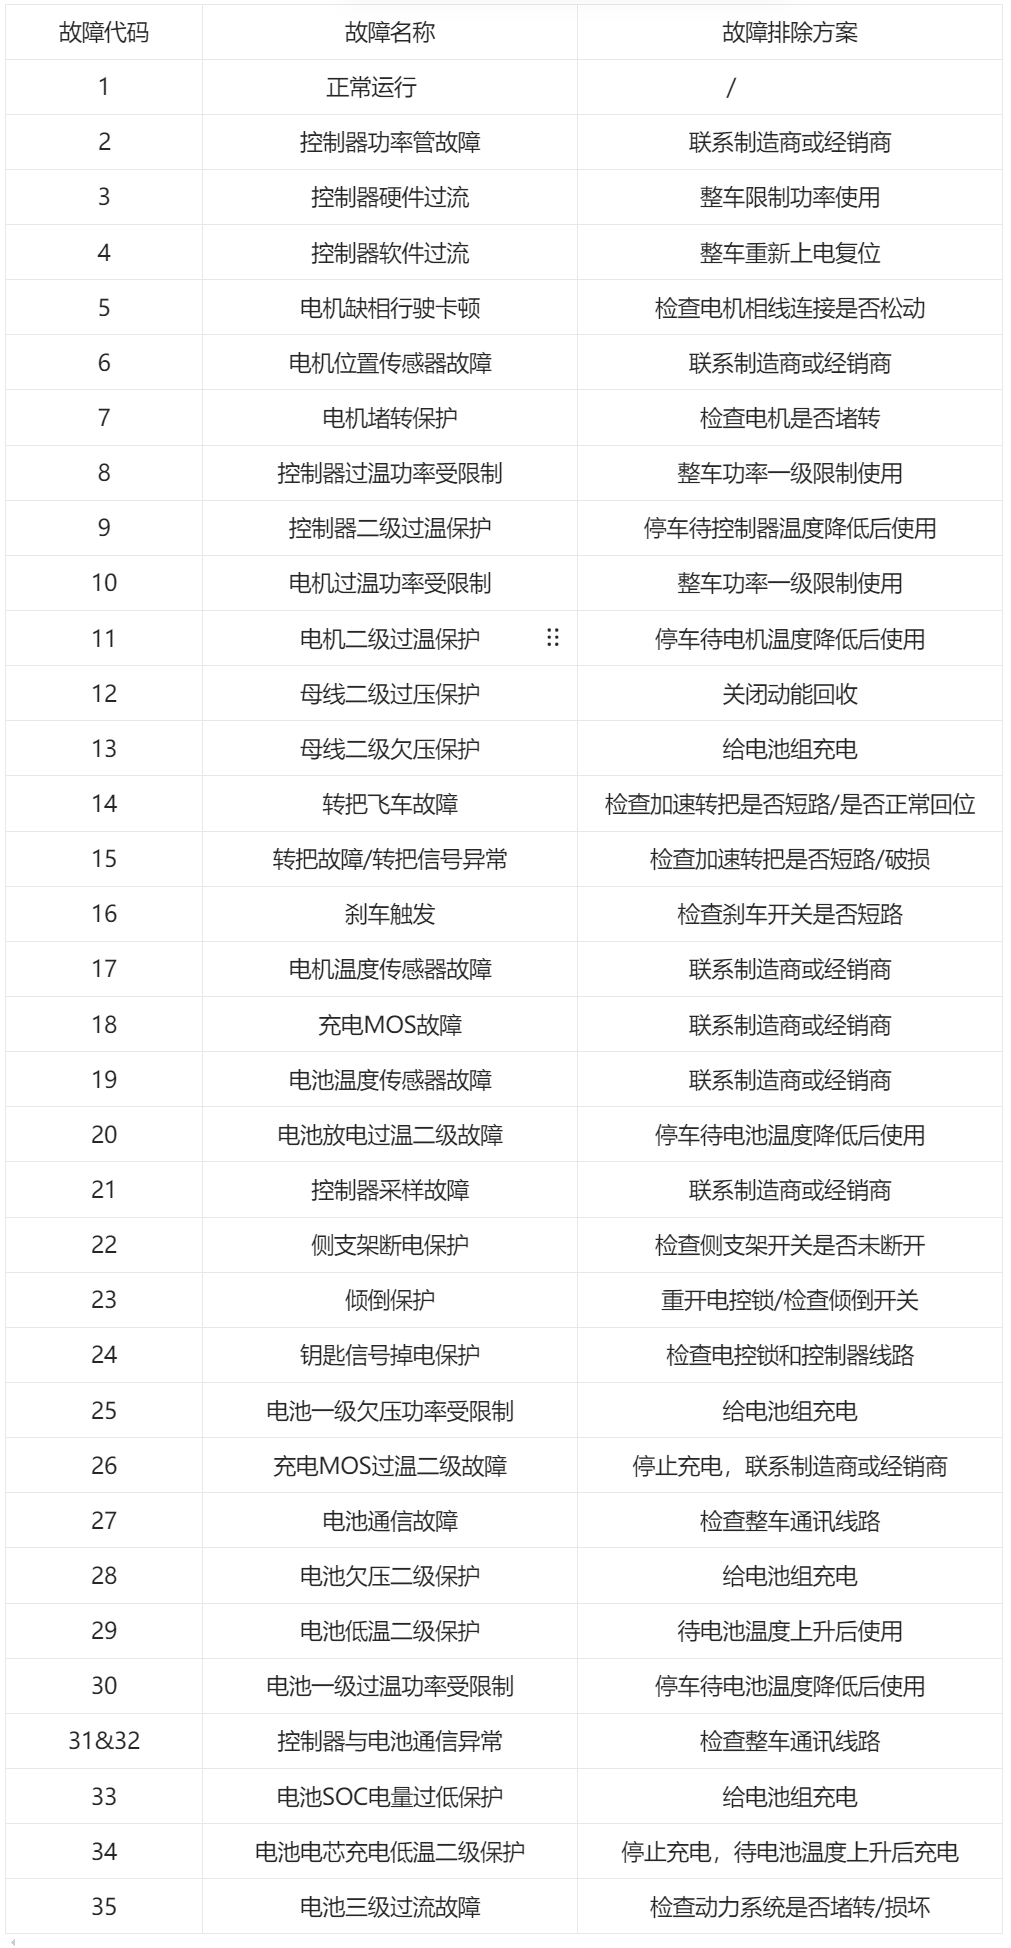
Fault Questions
- The Jimi IoT card can be checked in the Qiulong Butler APP;
- If the Qiulong Butler APP cannot be queried, you can consult the official after-sales service.
Daily Maintenance
Other Questions
Binding Vehicles
Tool Usage
When using, the tool must be fully engaged in the tool position. Larger wrenches require one hand to stabilize the tool to prevent slipping.
It is only used as an auxiliary tool for installation. It is strictly forbidden to directly hit the parts. If direct hitting is required, it is necessary to use a pad with lower hardness for protection.
Precision tools with higher unit prices must be operated strictly in accordance with the instructions. Ensure the correctness of the torque reading.
Pay attention to selecting power tools with appropriate torque. High-torque power wrenches are easy to damage bolts or parts during operation. It is strictly forbidden to use high-torque power wrenches to tighten smaller-sized bolts and nuts (10mm and below). When tightening large-sized bolts and nuts, they should only be used for quick pre-tightening. The final locking should use a torque wrench to ensure that the correct torque is achieved.
Pay attention to the distinction between mineral brake oil and DOT brake oil systems. Tools and oils cannot be mixed.
Maintenance Tips
Regularly check the appearance of the battery pack and each high-voltage power harness for cleanliness and damage. Ensure that the input and output of the battery pack are clean, and immediately deal with the damaged parts of the battery pack.
Regularly check whether the battery pack clamping bracket is clamped firmly on the battery pack to prevent accidental failure of the battery pack power supply due to vibration when the vehicle is driving.
Regularly unplug the battery pack output power plug and use a multimeter to check whether the output voltage of the fully charged battery pack is within the normal range.
Warning: Be sure to wear insulating gloves before inspection.
This vehicle uses a high-performance high-rate battery pack, which can be used in an ambient temperature range of -20℃ to 50℃, and is best used in an ambient temperature of 10-30℃. Too low or too high an ambient temperature will affect the performance and service life of the battery pack. Do not use it at a temperature outside the allowable range. Do not charge the battery below 0℃.
Under normal ambient temperature, the charging time of this battery pack is about 3 hours, and the power should be turned off immediately after it is fully charged.
When not in use for a long time, please charge the battery pack to about 60%-80% for storage, and check the remaining power every month. Charge the battery pack once when it is less than 30% to prevent the battery pack from losing activity, affecting performance and causing damage.
It is strictly forbidden to rinse the battery pack with a high-pressure water gun, and the battery pack must not be soaked in water. The entire vehicle should not wade beyond the center of the wheel, otherwise it may cause water to enter the battery pack, internal short circuit, and permanent failure of the battery pack.
The battery pack casing should be cleaned with a rag with a small amount of clean water.
Warning: Do not charge the battery pack below 0°C, otherwise the battery pack will be damaged. You can wait until the battery pack temperature rises above 0°C before charging. The maximum allowable charging temperature inside the battery pack is 60°C (140°F). If the internal temperature of the battery pack exceeds this temperature, it can only be charged after cooling to below 60°C (140°F). If the battery pack has been rapidly discharged due to intense driving recently, the internal temperature of the battery pack may still be higher than 60°C (140°F) even if the ambient temperature is low.
Do not short-circuit the socket when cleaning the battery pack; Always charge the battery pack in a well-ventilated location away from flammable materials. If you want to charge the Qingfeng electric motorcycle outdoors, avoid charging in the rain.
Only use the original vehicle matching or manufacturer-specified dedicated charger to charge the battery pack. Using unapproved chargers or accessories may cause damage or malfunction of the battery pack, or even cause danger.
The battery pack is only allowed to stand naturally to return to normal temperature. It is prohibited to use other methods to heat up or cool down the battery pack.
Warning: After the battery pack has been output at high power or has been working under high temperature conditions, it may not be able to charge immediately. The battery pack should be cooled for 30 minutes or longer before charging. Because the battery pack management strategy prohibits charging when the internal temperature is high, otherwise it will shorten the life of the battery pack.
If the appearance of the battery pack is damaged, a strange smell is smelled during charging, the battery pack is too high, and it still cannot be fully charged for a long time, please stop charging immediately, disconnect the power supply, and contact the manufacturer immediately.
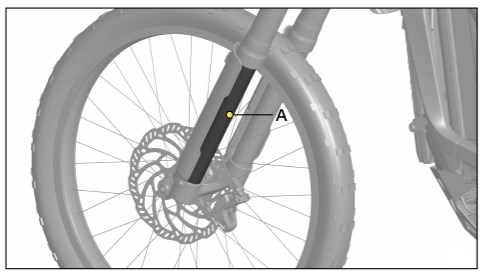
Never disassemble the LightBee shock absorber. Please follow the following to lubricate the suspension and keep it in optimal condition:
Remove the protective cover; Clean the dust (mud, old lubricant, etc.) on the surface of the fork tube; Use the special lubricant for LightBee shock absorber to evenly apply the surface A of the front shock absorber inner tube.
Warning: The shock absorber of the LightBee vehicle is not designed to be disassembled. Do not try to open the shock absorber or disassemble any parts inside.
Clean the dirt on the chain after each use of the vehicle. Maintain proper lubrication and apply specific chain oil.
Check the status of the chain regularly, place the light bee on a platform or stand, support the light bee from the bottom bracket area, and the rear wheel is suspended. After the rear wheel moves for a period of time, use a chain wear gauge to measure the wear of the chain. If there is significant wear, replace a new chain.
Check the chain tension regularly (see figure), lift the middle section of the lower row chain upward, and visually or use a ruler to check whether the chain swing is within 15-30mm. If it is not within the range, adjust the chain immediately.
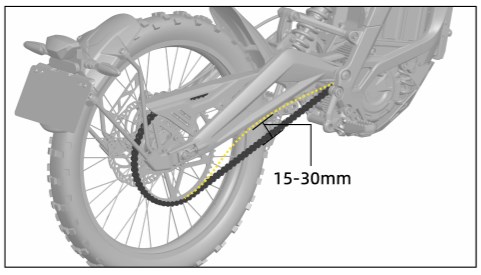
Place the Light Bee on a platform or stand so that it is supported from the bottom bracket area and the rear wheel is suspended.
Use a brush and a spray bottle (filled with soapy water) to thoroughly clean the larger dirt on the chain; Apply degreasing cleaner to the lower chain and wipe the chain clean with a rag after completion.
Apply motorcycle chain oil in front of the rear sprocket of the lower chain, a small amount is enough, and it should not be soaked. Then immediately turn the rear wheel forward so that the chain oil passes through all the chains to ensure that the rollers and the active nodes of the connector are coated.
When applying chain oil, try to avoid contaminating the brake system.
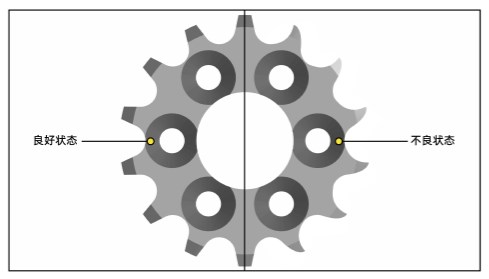
Check the wear of the front and rear sprockets. The image below shows the shape of the correct teeth and worn teeth. (Good condition / Bad condition) If it is in bad condition, it should be replaced.
Before using the vehicle each time, check whether the tires are damaged by foreign objects.
Check the tire tooth height regularly. If the height is less than 2mm, the tread will be worn to the warning line on the center line of the tire. If it is worn to the warning line, a new tire must be replaced immediately.
The inner tube pressure check must be done when the tire is cold, which means that the tire pressure should not be used in the last few hours before the check.
It is recommended to set the tire pressure to 225KPa for the front and rear wheels on paved roads and 100-150KPa for the front and rear wheels on unpaved roads.
Warning: Driving with inappropriate pressure or tires may result in:
Unexpected tearing;
Loss of vehicle control;
Increased rolling resistance when the pressure is too low;
Premature wear;
Pinching and puncture.
Place the Light Bee on the support frame so that it supports the Light Bee from the bottom bracket area; Confirm that the wheel rotates freely and check whether the wheel has lateral/longitudinal swing. If lateral/longitudinal swing occurs, measure the lateral/longitudinal movement with auxiliary tools. If it exceeds 1.5 mm, check whether the rim is deformed, whether the bearing is damaged, etc.
If the rim is in good condition, check and confirm whether the tire is properly installed on the rim.
If the rim is OK, but it is at an angle to vertical, the fork may be deformed, and you need to return it to the dealer for further inspection.
Each time you use the vehicle, you must use the brake handle several times before starting the vehicle without powering on and feel whether the braking force is normal. The piston rod bolt of the brake upper pump can adjust the compression stroke of the brake handle, thereby increasing or decreasing the compression stroke of the brake shoe on the brake disc; Regularly replenishing oil and exhausting air in the brake pump can effectively avoid faults such as reduced braking force or complete failure.
Every time you use the vehicle, you must check whether the brake shoe is in normal condition. If the brake shoe wear area is uneven, the gap is uneven, the wear is serious, or it is seriously contaminated, you need to adjust the brake caliper and replace the brake shoe in time; Regularly check that the caliper piston is functioning normally and clean.
Check the brake oil pipe regularly for damage or oil leakage. If necessary, replace it immediately.
Remove the brake caliper: Use a 3mm hexagon wrench to remove the brake shoe pin bolt A and the pin metal buckle; Take out the brake shoe B and the return spring; Use the tool to push the brake caliper piston inward to return to the same plane as the inner wall of the caliper; Install the new pad in the reverse order of disassembly. The tightening torque of the safety bolt is: 2.5 N.m. After installing the new brake shoe, the brake handle must be pressed repeatedly several times until the contact point between the brake shoe and the disc is stable.

Note: When returning the brake caliper piston, avoid improper operation to avoid piston damage; After replacing the brake shoe, the brake caliper needs to be vented if necessary to achieve maximum braking force.
Visually check the remaining amount of brake shoe material from the side of the brake caliper If the thickness of the front and rear brake shoes is less than 2.5mm, please replace the brake shoes. If the metal part A of the brake shoe is damaged, please replace both brake shoes immediately regardless of the damage.
Brake shoe replacement It is recommended to check and run-in after replacing the new front and rear brake shoes B or brake disc to ensure that the brake disc and the front and rear brake pads are re-adapted and matched. Proper running-in can improve the brake feel and reduce or eliminate brake noise.

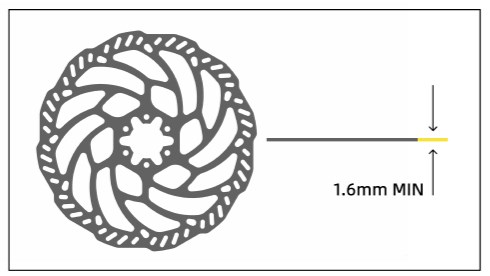
Regularly check the brake disc's brakeable area to ensure it is at least 1.6mm thick. If it is less than this thickness, it needs to be replaced immediately. The brake disc must be flat and not deformed to ensure normal operation. A bent brake disc will cause irregular braking, poor braking power and control, and accelerate the wear of the brake shoe.
Place the Light Bee on a support stand so that it supports the Light Bee from the bottom bracket area, rotate the wheel and observe the clearance between the disc and the brake pad to check if the disc has any indentation or bending. Slight lateral movement is acceptable as long as the disc does not rub. If the disc rubs the brake pad at a certain point, it is recommended to use the brake pad correction tool and other tools to adjust it or replace it immediately.
The QingBee electric motorcycle is equipped with a parking brake that should prevent the rear wheel from rolling when the rear brake parking paddle (located on the left handlebar) is in the park position. Please check the parking brake regularly.
Note: Do not touch the brake surface of the disc or shoe with your hands, as the grease on your hands may reduce the braking force; Do not allow oil or brake fluid to contact the brake disc. If this happens, remove the disc and clean it thoroughly with ethylene propylene alcohol; Do not adjust the push rod adjustment screw on the handle at will, as this will cause the oil circuit to not be replenished normally after the brake wears; If the brake system function declines or fails, please contact the authorized dealer or after-sales service immediately.
Warning: When using a new brake system or new brake pads, the initial braking force may be too small. Please try to run-in the brake pads and brake discs at a low speed and safely to ensure that the brake system provides normal braking force; If the parking brake cannot effectively lock the rear wheel, please contact the authorized dealer or after-sales service in time.
The tightening torque values of bolts and nuts in important parts of the vehicle need to be checked regularly. The vehicle needs to regularly check whether the cable ties, clamps, and buckles in various parts are functioning normally;
Check whether the shock absorber function is intact;
Check whether there are foreign objects in the shock absorber inner tube, please keep the inner tube clean and in good appearance;
Check whether there is a lot of oil leakage in the dust cover;
Check whether the outer tube and other parts are damaged.
Fault Guidance


Get support
After-sales engineers are ready to provide you with solutions

Postsale Engineer
After-sales Customer Service Surron
Phone: +64 9 200 4876
Monday to Friday: 9am to 6pm
